Here’s a brief guide on managing the sidebar of your WordPress website using OceanWP:
-
Access Your WordPress Dashboard: Log in to your WordPress site using your username and password, as mentioned in “How to Log In to Your WordPress Dashboard”.
-
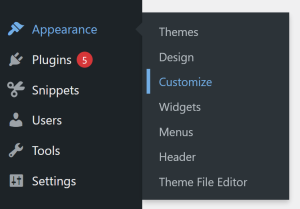
Navigate to the Customizer: From the dashboard, go to the Appearance tab and select Customize.
-
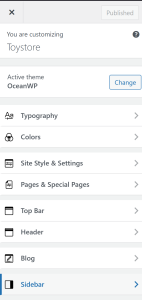
Find the Sidebar Section: Within the Customizer, look for the Sidebar or Widgets section. This is where you can control what appears in your site’s sidebar areas.
-
Select the Sidebar Area to Edit: You may have multiple sidebar areas depending on your layout (e.g., left sidebar, right sidebar, footer sidebars). Choose the area you want to change.
-
Add or Remove Widgets:
-
Add Widgets: Click Add a Widget to choose from available options such as Recent Posts, Categories, Search, or Text.
-
Remove Widgets: Click the widget you want to remove and select Delete.
-
Reorder Widgets: Drag and drop widgets to change their order within the sidebar.
-
-
Customize Widget Settings: Some widgets allow for additional customization, like titles, content, or links. Configure each widget to match your site’s design.
-
Preview Your Changes: Use the live preview to see how the sidebar looks on desktop, tablet, and mobile devices before publishing changes.
-
Save Changes: Once you’re satisfied with your sidebar updates, click the Save & Publish button to make the changes live on your site.
By following these steps, you can easily manage your website’s sidebar, providing visitors with helpful content and an easy-to-navigate site.