Here’s a brief guide on managing the footer of your WordPress website using OceanWP:
-
Access Your WordPress Dashboard: Log in to your WordPress site using your username and password, as mentioned in “How to Log In to Your WordPress Dashboard”.
-
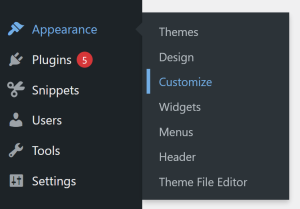
Navigate to the Customizer: From the dashboard, go to the Appearance tab and select Customize.
-
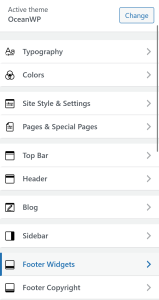
Find the Footer Section: Within the Customizer, look for the Footer section. This is where you can control the layout, content, and styling of your site’s footer area.
-
Choose Your Footer Layout: OceanWP offers multiple footer layouts, including single-row, multi-column, or widget-based footers. Select the layout that best fits your site design.
-
Add or Edit Footer Widgets
-
Add Widgets: Click Add a Widget to include elements like text, menus, social icons, recent posts, or custom HTML.
-
Edit Widgets: Click a widget to modify its content, title, or settings.
-
Remove Widgets: Click the widget and select Delete if you no longer want it displayed.
-
-
Customize Footer Styling: Adjust colors, typography, and background settings to match your site’s overall design. Some options may include changing text color, link color, or adding a background image.
-
Preview Your Changes: Use the live preview to see how your footer looks on desktop, tablet, and mobile devices before publishing.
-
Save Changes: Once you’re satisfied with your footer updates, click the Save & Publish button to make the changes live on your site.
By following these steps, you can easily edit your website’s footer, creating a professional, functional, and visually consistent bottom section that enhances your website.