Here’s a brief guide on managing the typography of your WordPress website using OceanWP:
-
Access Your WordPress Dashboard: Log in to your WordPress site using your username and password, as mentioned in “How to Log In to Your WordPress Dashboard”.
-
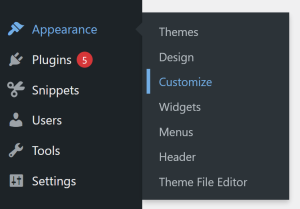
Navigate to the Customizer: From the dashboard, go to the Appearance tab and select Customize.
-
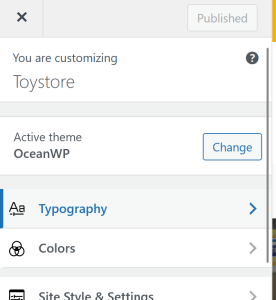
Find the Typography Section: Inside the Customizer, look for the Typography section. This is where you can control fonts, sizes, line spacing, and other text-related settings for your site.
-
Select the Text Area to Edit: OceanWP allows you to customize typography for different parts of your site, including:
-
Body Text: The main text used throughout your pages and posts.
-
Headings: Titles and headings used across your site.
-
Menus & Buttons: Text displayed in menus and buttons. Click on the section you want to edit to reveal the typography options.
-
-
Choose Your Font: Select a new font from the dropdown menu. You will have access to hundreds of options.
-
Adjust Font Size and Style: Use the provided sliders or input fields to adjust:
-
Font size
-
Font weight (light, regular, bold, etc.)
-
Letter spacing
-
Line height
Preview your changes in real time to see how they affect your site’s design.
-
-
Apply Changes For Every Page or Per Section: You can choose to apply typography changes to the whole site or just to specific parts (like headings or body text) for more control.
-
Preview Your Changes: Before saving, preview your changes to make sure you are satisfied with your texts.
-
Save Changes: Once you’re satisfied with your typography updates, click the Save & Publish button to make the changes live on your site.
By following these steps, you can easily update your website’s typography, giving your site a more professional look.