Here’s a brief guide on managing the colors of your WordPress website using OceanWP:
-
Access Your WordPress Dashboard: Log in to your WordPress site using your username and password, as mentioned in “How to Log In to Your WordPress Dashboard”.
-
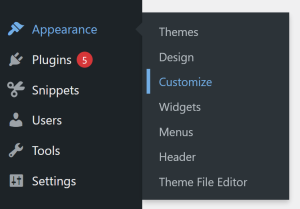
Navigate to the Customizer: From the dashboard, go to the Appearance tab and select Customize.
-
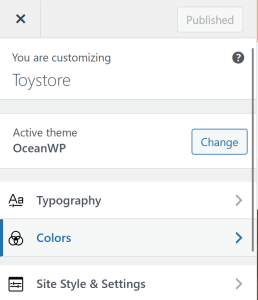
Find the Colors Section: Inside the Customizer, look for the Colors or General Options → Colors section. This is where you can manage the color scheme for your entire site.
-
Choose What to Edit: OceanWP allows you to customize colors for different elements, including:
-
Text and Headings: Body text, headings, and menus.
-
Links: Standard, hover, and active link colors.
-
Backgrounds: Page background, section backgrounds, and header areas.
-
Buttons and Accents: Primary buttons, hover states, and accent highlights.
-
-
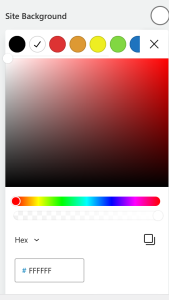
Pick Your Colors: Click on each color field to open the color picker. You can choose a color manually, enter a hex code, or select from a palette if available.
-
Preview Your Changes: As you adjust colors, the live preview will update in real time. This lets you see exactly how your choices will affect the look of your website.
-
Apply Changes For All Pages or Per Section: You can set colors for your entire website, or just for specific parts like headers or footers for a more customized look.
-
Save Changes: Once you’re satisfied with your color updates, click the Save & Publish button to make the changes live on your site.
By following these steps, you can easily update your website’s colors, giving your site a professional look while improving the experience of your users.