Here’s a brief guide on how to customize your blog archive layout using the OceanWP theme in WordPress:
-
Access Your WordPress Dashboard
Log in to your WordPress site with your username and password, as mentioned in “How to Log In to Your WordPress Dashboard”. -
Open the Customizer
From the dashboard menu, go to Appearance > Customize.
This is where all layout and styling controls are managed.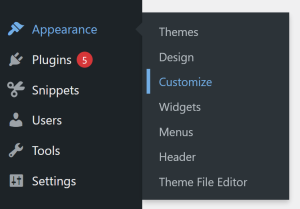
-
Go to the Blog Settings
Inside the Customizer, select Blog, then choose Blog Entries.
The “Blog Entries” section controls all archive-style pages, including:-
Blog homepage
-
Category archives
-
Tag archives
-
Author archives
-
Date archives
-
-
Choose a Layout Style
Adjust how posts appear in your archive pages. Options include:-
Grid layout
-
Large featured image layout
-
Thumbnail/compact layout
-
Number of posts per row (for grid styles)
-
-
Customize Post Elements
Select which elements should appear on each post preview, such as:-
Featured image
-
Post title
-
Author name
-
Publish date
-
Categories
-
Comments count
-
Read More button
-
-
Adjust Featured Image Settings
Set the size, ratio, and alignment of featured images to match your design style. -
Modify Excerpt Length
Control how many words appear in each post preview.
This helps create either a compact layout or a more content-rich feel. -
Configure Spacing and Alignment
Adjust margins, padding, and item spacing to fine-tune the visual layout. -
Check Sidebar Layout
Under Blog > Blog Entries, you may also choose whether archive pages use:-
No sidebar
-
Left sidebar
-
Right sidebar
To edit the sidebar content itself, go to Appearance > Widgets.
-
-
Preview Your Changes
Use the live preview to confirm layout, spacing, and style across devices. -
Save and Publish
When you’re satisfied, click Save & Publish to apply your new archive layout settings.
By following these steps, you can easily control the structure and appearance of your blog archive pages, keeping your blogs organized across your site.