Here’s a brief guide on how to edit your blog settings and layout using the OceanWP theme in WordPress:
-
Access Your WordPress Dashboard
Log in to your WordPress site using your username and password, as mentioned in “How to Log In to Your WordPress Dashboard”. -
Navigate to the Customizer
From the left-hand menu, go to Appearance > Customize. This is where all your blog styling and layout controls live.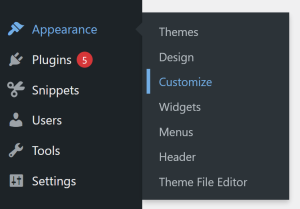
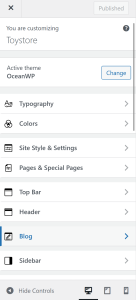
-
Open the Blog Settings
Inside the Customizer, select Blog.
This section controls both your Blog Entries (the main posts page) and your Single Posts (individual blog posts).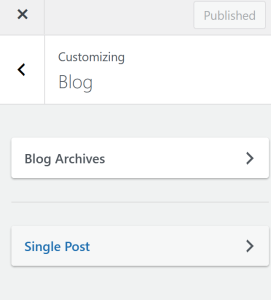
-
Edit Blog Entries (Main Blog Page)
Go to Blog > Blog Entries to adjust how your posts appear on your main blog page.
You can customize:-
Layout style (grid, thumbnail, large image, etc.)
-
Number of columns
-
Featured image size
-
Post elements (author, date, categories, comments, read more button)
-
Excerpt length
-
Spacing and alignment
-
-
Edit Single Post Layout
Go to Blog > Single Post to customize the appearance of individual posts.
You can modify:-
Featured image display
-
Post title style
-
Post meta (the date, author, categories)
-
Next/previous navigation
-
Related posts section
-
Comments layout
-
-
Customize Blog Styling
For colors, typography, and spacing when it comes to the blog, you can change the options under:
Customizer > General Options
This lets you match your blog’s style with the rest of your site. -
Preview Your Changes
Use the live preview to see how your blog looks on desktop, tablet, and mobile before saving. -
Save and Publish
Click Save & Publish to apply your blog customizations to your live site.
By following these steps, you can easily edit your blog’s layout, style, and content in OceanWP, creating a clean and cohesive reading experience for your visitors.