Here’s a brief guide on how to customize your website’s top bar using the OceanWP theme in WordPress:
-
Access Your WordPress Dashboard
Log in to your WordPress site using your username and password, as mentioned in “How to Log In to Your WordPress Dashboard”. -
Navigate to the Customizer
From the dashboard, go to Appearance > Customize.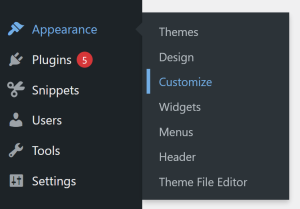
-
Find the Top Bar Section
Inside the Customizer, open Top Bar. This is where you can enable, disable, and customize the top area that appears above your site’s header.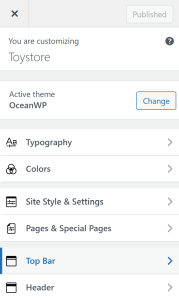
-
Enable or Disable the Top Bar
If the top bar isn’t currently visible, toggle the Enable Top Bar setting. Once activated, it will appear above your main header area. -
Edit Top Bar Content
Go to Top Bar > Content to customize what appears in the left and right sections of the bar. You can add text, shortcodes, social icons, or even contact information like an email address or phone number.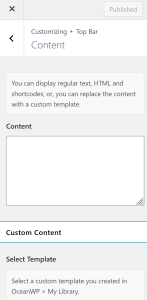
-
Customize the Top Bar
You can change your Top Bar, customizing its size and borders, as well as its specific colors and typography. For more general site changes, visit colors and typography. -
Add Social Links
Navigate to Top Bar > Social Menu to add your social media profiles. You can adjust icon colors, hover effects, and positioning. -
Preview Your Changes
Use the live preview to see how your top bar looks on different devices before saving. -
Save and Publish
Once you’re satisfied with your edits, click Save & Publish to make the changes live.
By following these steps, you can easily edit and style your website’s top bar in OceanWP, creating a professional header area that improves your user experience.