Here’s a brief guide on managing performance settings through the Customizer to help improve your website’s loading speed and overall efficiency:
-
Access Your WordPress Dashboard
Log in to your WordPress site using your username and password, as mentioned in “How to Log In to Your WordPress Dashboard”. -
Navigate to the Customizer
From the dashboard, go to Appearance > Customize.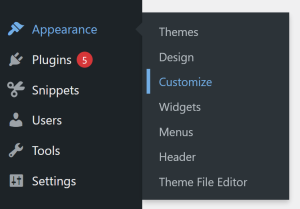
-
Find the Performance Section
Within the Customizer, locate the Performance panel. This section includes settings that optimize how certain designs load on your site.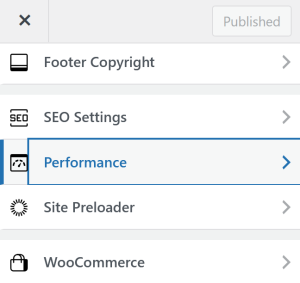
-
Enable or Disable Scripts
Manage optional features that may affect performance, such as: loading icons, animations, or effects only when needed. You may also disable unused scripts to minimize load times. The following are scripts you can enable and disable:-
Emojis
-
Font Awesome Icons
-
Ocean SVG Icons
- Simple Line Icons
- Lightbox
- Custom Select
- Widget Stylesheet Load
- Scroll Effect
-
-
Preview Changes
Use the live preview feature to ensure your changes don’t affect the design or functionality of your pages in a way you don’t want. -
Save Changes
Once satisfied with your performance settings, click Publish to apply the optimizations to your live website.
By using the performance settings, you can speed up load times and create a smoother browsing experience.