Here’s a brief guide on adjusting your sticky header settings in Customizer so your menu or header elements stay visible while users scroll:
-
Access Your WordPress Dashboard
Log in to your WordPress site using your username and password, as mentioned in “How to Log In to Your WordPress Dashboard”. -
Navigate to the Customizer
From the dashboard, go to Appearance > Customize.
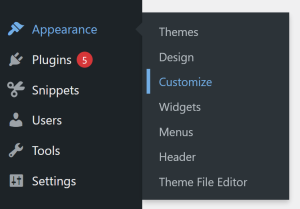
-
Open the Sticky Header Settings
Inside the Customizer, select Sticky Header to view all options.
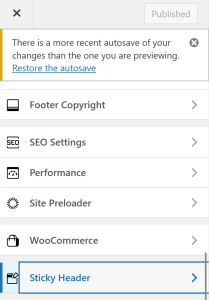
Inside, you can see all options for Sticky Headers. -
Sticky Header Elements
Here you can edit all elements of the Sticky Header.
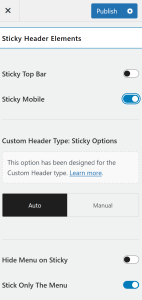
-
Choose a Sticky Style
Select the style you want for your sticky header. Depending on your theme settings, options may include:-
Shrinking header
-
Fixed header
-
Scroll-up reveal header
-
-
Adjust Sticky Header Settings
Configure additional options such as:-
Sticky header height
-
Background color
-
Border options
-
Logo size for sticky mode
-
Menu color or styling adjustments during scroll
-
-
Preview Your Changes
Scroll through the preview window to check how the sticky header behaves and looks on your site. -
Save Changes
Once everything looks correct, click Publish to apply your sticky header settings to your live website.
A sticky header can make navigation easier for visitors and improve overall user experience by keeping key links accessible at all times.